02. VUE JS: Inisiasi dan Setting Up Project

Yow.

Vue punya Command Language Interface (CLI) yang keren banget. Di sini saya akan pakai Vue CLI dan Microsoft Visual Studio Code (VS Code) sebagai IDE. Project yang dibikin akan memanfaatkan progressive web app (pwa) dengan nama bookbuilding.

Di terminal

1. Bikin folder project bookbuilding lalu masuk ke folder itu

$ mkdir bookbuilding && cd bookbuilding

2. Inisiasi project dengan pwa

$ vue init pwa && npm install

Akan menghasilkan

? Generate project in current directory? Yes
? Project name bookbuilding
? Project short name: fewer than 12 characters to not be truncated on homescreen
s (default: same as name)
? Project description Bookbuilding by Liberika
? Author Mangkum <ipk4cumlaude@yahoo.com>
? Vue build standalone
? Install vue-router? Yes
? Use ESLint to lint your code? No
? Setup unit tests with Karma + Mocha? No
? Setup e2e tests with Nightwatch? No

vue-cli · Generated “bookbuilding”.

3. Buka VS Code

$ code .

4. Jalankan server untuk development

$ npm run dev

Kita sekarang udah punya file project dengan webpack yang lengkap untuk digeboy.

Di VS Code

Secara default router akan menambahkan tanda pagar yang géngges di URL seperti ini:

http://localhost:8080/#/

Oleh karenanya, saya akan membunuh pagar ini dengan masuk ke direktori

src/router/index.js

Lalu tambahkan mode: ‘history’ sehingga seperti ini:

export default new Router({
 routes: [
 {
 path: '/',
 name: 'Hello',
 component: Hello
 }
 ],
 mode: 'history'
 })

Setup udah rébés. Mari kita gali lebih dalam…

01. VUE dengan NPM

Yow.

Vue punya Vue Command Language Interface (VUE CLI), untuk menggunakannya salah satu caranya harus pasang Node Package Manager (NPM). Mari kita pasang NPM dulu guna mempermudah hidupmu.

01. Pasang Git dulu

02. Pasang Node Version Manager (NVM)

  • Pasang NVM dari https://github.com/creationix/nvm atau pakai curl:
  • $ curl -o- https://raw.githubusercontent.com/creationix/nvm/v0.33.6/install.sh | bash
  • Uji pemasangan harus mengembalikan  nvm:
  • $ command -v nvm
  • Segarkan ke versi terakhir dengan:
  • $ nvm install —latest-npms

03. Pasang node.js

  • Pasang node.js
  • $ nvm install stable
  • Buat default node.js:
  • $ nvm alias default stable
  • Coba dan lihat versi:
  • $ node -v
  • Segarkan ke versi terakhir:
  • $ nvm install --latest-npm

04. Pasang VUE CLI

$ npm install --global vue-cli


Yuhu VUE CLI sekarang siap digeboy!

00. Project Bookbuilding dengan VUE JS

Yow.

Setelah bikin http://lrtcity.liberika.com, saya akan coba bikin project bookbuilding untuk keperluan bookbuilding saham yang disebut juga tahap fixed allotment pada proses penawaran umum saham perdana atau IPO atau lebih gaya disebut go public.

Tahap paling awal adalah bikin desian wireframe atau ya pakai PowerPoint aja guna mengejewantahkan ide tampilan yang jadi acuan. Ide tampilan bisa dicari di https://www.dribbble.com. Saya suka idenya Capitanu.

Screen shotnya nanti saya kirim di mari ya…

Stacks Front End:

  1. Vue JS
  2. Axios (pakai Apollo jika menggunakan GraphQL)
  3. Greenshock untuk UX Design
  4. Plain CSS tanpa bootstrap
  5. Gambar menggunakan SVG

Stacks Back End:

  1. Node JS
  2. Express JS
  3. REST (jika sempat akan menggunakan GraphQL)
  4. Mongo DB sebagai basis data NoSQL
  5. JWT
  6. OneDrive atau Google Drive untuk tempat penyimpanan files

Software:

  1. VS Code untuk Editor (atur VS Code CLI)
  2. iTerm untuk Terminal
  3. Chrome Browser atau Firefox
  4. Vue Add On/Extention di Firefox/Chrome


Nanti saya tambahin kalau ada tambahan stacks.

Visual Studio Code CLI di MacOS

Yow.

Kamu bisa meluncurkan Visual Studio Code (VS Code) dari Terminal untuk dengan ceprat membuka file atau folder atau project. Seperti ini nih…

$ code .

Carane:

  • Buka VS Code
  • Buka Command Palette (⇧⌘P) dan ketik shell command  untuk menemukan perintah Shell Command: Install ‘code’ command in PATH

Mac shell commands

  • Restart Terminal agar nilai $PATH ini berdampak.


Udah gitu doang. Untuk Windows, bisa cek di mari.

Full Stack Web Developer/Designer

Yo my man…!

I’ve been busy with my main job as an investment banker helping companies in raising fund from capital market and stuffs, recently. After all this time, I have lil bit more time again to do coding and designing. Say YAAY! I’ve been thinking recently what to be mastered if we wanna be a full stack web developer/designer. Here we go…

We can separate the web developer/designer in two sections, which are VIEW and MODEL as in Model-View-Controller. For view, it’s all about design and art not to mention consuming data supplied by model. Meanwhile for model, it’s all about data management and preparing data to be displayed/consumed by view section. In this article, I am trying to give you the most popular tools/apps in the web app industry, according my reading so far.

VIEW

  1. HTML, of course.
  2. SASS for CSS. As Bootstrap 4 ditched LESS and opts SASS instead, it is better if you learn SASS for CSS.
  3. Vue.js for Javascript. Vue.js is getting popular as Laravel uses Vue.js and it offers simple lines of coding to do advanced things. Once you use Vue.js, you can ditch jQuery. Like React Native, if you wanna make mobile app, you can use Veex to have access to native API. Veex is OS agnostic and used by, among others, Alibaba.
  4. SVG Animation. It has been getting its popularity in the past two years as many browsers are now supporting SVG. SVG is an image built by math vis-a-vis pixel for jpeg. Inside SVG is XML tags and numbers. We can add javascript (including Vue.js or Vuex) inside the SVG file to make it interactive (gives you an artsy feedback and responses naturally) and pretty and fun animations. It is gorgeous yet maintain the good performance for web app. I bought a book from Google Play Book (GPB) just now titled SVG Animations by Sarah Drasner. Somehow GPB offers the most attractive pricing for this book which is only c. USD10.3 (before 80% discount!!!!! so net c. USD1), compared with Kindle Store of c. USD25 and paper of c. USD40.
  5. Bootstrap Vue for responsive layout. Current Bootstrap 4 takes advantages of jQuery. Since we are now using Vue.js so that we have to find out alternative to replace Bootstrap. Some suggests modernizr but I think we do not need to use a kinda Bootstrap, we can make it by ourselves using CSS.
  6. Font-Awesome. It is getting its popularity since it’s very simple and lightweight. Bootstrap replaces Glyphicon with font-awesome.
  7. Techan.js. It is the best technical analysis chart library built on D3 and SVG, if I may say.
  8. Other things that I have to find out, among others, is the framework to handle Vue.js for multiple files website. Any idea?

MODEL

It is quite difficult to determine which tools to be used for Model. Previously, people have been using Apache or nginx for server, MySQL and its peers for database and Java or PHP (using Slim or Laravel Framework) to provide a RESTful API. I don’t know yet the node.js but it is a server, that all I know for now LOL. I’ll update this article once I know what node.js is. The industry has been evolved. For instance, Google offers Google Cloud Platform (GPC) to handle back-end (front-end as well) with the most sophisticated products. You can try it at cloud.google.com for free.

Many years ago, people talked about virtual machine but now we’re talking about docker container and Kubernetes using node.js to handle app. GPC has these line of products and we can just use it without pain in the ass. It supports scalability if our app getting its popularity.

By using GCP and its peers services, no more concerns on model.


To sum up, if we wanna be a full-stack web developer/designer, we do not need to master jQuery and PHP again, unless you use Laravel in the model. We now can focus more on the view and let GPC (and its peers) handles the model. You can learn tools in bold text and find the material in the internet or watching video course in Youtube. It is easy to learn nowadays.

Thank you for reading.


Smart TV with Raspberry Pi

My Raspi has been stayed next to my TV for months and got stranded all over again. It used the first OS of Raspi in wich the omxplayer installed to play multimedia files. I just created the bash script to run all the multimedia files easily.

Unluckily, it could not detect my external hardisk anymore when I’d like to play the m4v file. My Samsung TV can’t play the file as well, apparently. So, I wiped all the Raspy OS and changed it into XBMC. In fact, I tried the XBMC back then but it did not perform well. It was horrific, honestly.

As the time going, the XBMC got the popularity. I checked Youtube to see how is its performance today. The video compares two XBMCs and concludes that the openelec XBMC outperformed another. So I go for it.

The installation is very easy. It only consumed no more than five minutes to set up. What you have to do is download the OS and burn it into an SD Card. Mine is only 2GB. Afterwards, install the SD Card firmly into the slot in your Raspi. Turn the power on to continue the process.

The Raspi will automatically set up the program then it will restart by itself to complete the setting. This is it! In no time, you already have a Smart TV. However, it is not the final form of the XBMC Raspi.

In order to build the real Smart TV, you need to plug the network or wireless network. I use wifi dongle. I tether my Android phone to broadcast the WiFi signal. I connect the Raspi as well as my iPad to the WiFi. iPad is used as a remote control. You have to install the free XBMC app from AppStore. Then set the IP address along with its access name and password to connect between iPad and Raspi. You can use other gadgets based on Android, iOS or Windows Phone system as a remote control.

Is it the final form? Not yet!

The XBMC has transformed in to the flawless OS. You can install add-ons to enrich the contents. I already installed Youtube, TED and many more add-ons to be watched streamingly.

That is the final form!

I just hope that my Raspi would not be stranded anymore. Amiin!

Raspi Buat Streaming TV

Gara-gara weekend kemaren pengen nonton ATP tapi ga ada channels yang tersedia di apartemen yang nyiarin, saya live streaming pake laptop. Well, tennis jarang peminatnya sih di Indonesia. Tinggal colokin sih Thunderbolt di MangBook ke HDMI tipi. Terus di-full screen deh. Bagus streamingnya ga nginul dan patah-patah. Tapi ya resolusinya ga begitu gede. Secara, kalau HD, internet saya yang jebol.

Tapi setelah dipikir-pikir, saya punya satu “komputer” nganggur yang bisa dedicated buat nonton TV streaming dari internet. Dia adalah the stranded Raspberry Pi. Akhirnya, lu ada gunanya juga.

Semalem, coba googling dan install biar si Raspi bisa mainin youtube. Tapi sudah coba tiga “installers”, belum ada yang pas. Instalasi yang terakhir belum dicoba sih, karena harus masup kantor pagi ini.

Nanti ya kalau udah sukses, saya update tulisan ini. Stay tune!

Raspberry Pi as a Multimedia Player

So, I ended this weekend by playing with my stranded Raspberry Pi.

As of today, I have three computers with three different operating systems. Raspberry Pi uses Linux based on Debian distro. Actually, I’d like to use a kind of multimedia OS. However I have to download the OS of more than one Gig size in the office :P. My second computer is Mangbook. Ya you know it, it uses OSX as an operating system. And, the last computer is the brand new i5 desktop computer uses Windows OS, of course, it’s for my lil’ brother to finish his thesis.

What have I done to my Raspberry Pi?

My objection is very simple. It is to play the full HD video clips and movies using the tiniest computer in the world, the Raspberry Pi.  I want to play movies or video clips in my full HD TV that has no feature of plug and play the video files via its USB port.  I forgot what the OS my Raspberry Pi uses. In this OS, there is a video player but it should be called in the Terminal. I can not simply click the movie file in the File Manager (it’s like Windows Explorer in Windows OS) and play it. It has no GUI yet. The video player is omxplayer. To play the video file, I have to type this line in the Terminal: Continue reading “Raspberry Pi as a Multimedia Player”

Showing WordPress Posts in Your Own Website

Sama seperti tulisan sebelumnya, namun kali ini ngambil posts di blog wordpress untuk ditampilkan. Bedanya, kalau ini formatnya XML kalau Twitter formatnya json. Tapi ga masalah. Mari kita saksikan bagaimana caranyo?

Ambil dan Parsing Posts Pake Feed RSS versi 2 dari WordPress

Ini adalah skrip untuk ngambil rss dengan item lima post ($i). Lalu kelima post ini dimasukin ke dalam array $data_ary. Nanti $data_ary ini bisa di foreach untuk ditampilkan di html, atau bisa juga ditampilkan dalam bentuk json buat webservice seperti yang saya lakukan (tapi di contoh ini hanya sampai array aja). Baiklah, inilah skrip yang saya modif dari mari. Continue reading “Showing WordPress Posts in Your Own Website”

Showing Tweets in Your Own Website

Sebelumnya, ga perlu pake oAuth buat ngambil json Tweets di twitter. Dengan API 1.1, semua harus melalui otorisasi untuk mengakses webservice Twitter. Langsung aja, gimana caranya nampilin tweets di website sendiri?

Bikin Twitter App

Creating Twitter App
  1. Bikin apps dulu dengan pergi ke mari https://dev.twitter.com/apps/new, kalau belum login, ya login dulu pake akun Twitter Anda!
  2. Masupin datanya lalu klik Submit. Anda bakalan dapetin Consumer key dan Consumer secret.
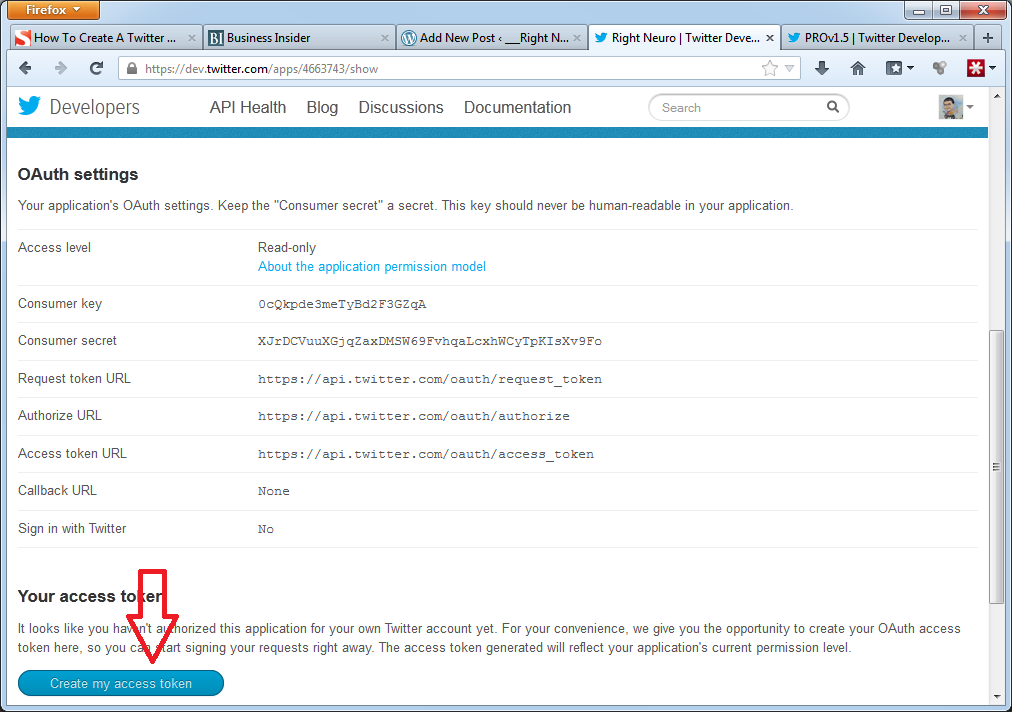
  3. Nah di halaman ini, klik tombol Create my access token buat dapetin Access token dan Access token secret.
  4. Twitter App sudah sukses terbikin

Selanjutnya ialah tarik data tweets ini ke website pake PHP. Continue reading “Showing Tweets in Your Own Website”